|
BRIDGE
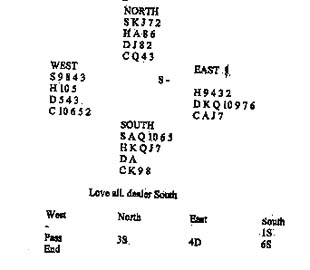 SOUTH
had only 18 points, its true, but his loser-count was just four (one
in each of the majors, two in clubs), so prospects for a slam were good.
Also Easts 4D suggested that North would have little wasted in
diamonds, opposite the bare ace. A diamond was led to the ace and
declarer cashed the ace of trumps, discovering the 4-0 break. How would
you have continued? If trumps had been 3-1 or 2-2, you could simply have
thrown a club from dummy on the fourth heart, given up a club, and
ruffed a club for your twelfth trick. The 4-0 trump break prevents you
from doing this (unless West also has four hearts and will have to
follow suit all the way). A idea is to reverse the dummy, ruffing two
diamonds in the South hand, drawing trumps in the North hand, and
eventually throwing one of Norths clubs on your last heart. At Trick
2 you play a spade to the 8 and jack. You then ruff a diamond high and
lead the club king, which East will probably duck. A heart to the ace is
followed by a second high diamond ruff. You then play a low trump to
dummys 7, draw the last trump, and score three more hearts for the
contract. SOUTH
had only 18 points, its true, but his loser-count was just four (one
in each of the majors, two in clubs), so prospects for a slam were good.
Also Easts 4D suggested that North would have little wasted in
diamonds, opposite the bare ace. A diamond was led to the ace and
declarer cashed the ace of trumps, discovering the 4-0 break. How would
you have continued? If trumps had been 3-1 or 2-2, you could simply have
thrown a club from dummy on the fourth heart, given up a club, and
ruffed a club for your twelfth trick. The 4-0 trump break prevents you
from doing this (unless West also has four hearts and will have to
follow suit all the way). A idea is to reverse the dummy, ruffing two
diamonds in the South hand, drawing trumps in the North hand, and
eventually throwing one of Norths clubs on your last heart. At Trick
2 you play a spade to the 8 and jack. You then ruff a diamond high and
lead the club king, which East will probably duck. A heart to the ace is
followed by a second high diamond ruff. You then play a low trump to
dummys 7, draw the last trump, and score three more hearts for the
contract.
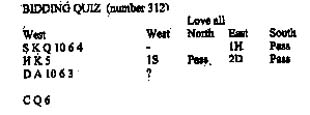 Bidding quiz Bidding quiz
What would you say now on the West cards?
Answer
A raise to 3D would be non-forcing, so you cannot
risk that. The name is true of 3S, which is again non-forcing. To bid
3NT without a club stopper is too much of a gamble. The best idea is to
show your strength with a bid in the fourth suit (3C). After partners
response you will have a much better idea game (or slam) will be best.
Awards: 3C (fourth suit)-10, 4D/3NT-6, 3S/3D-3.
Knight Features
|
