|
Bridge
 You
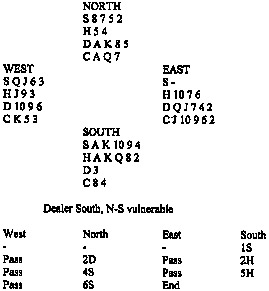
can see how useless
Blackwood would be on the South had. Twelve tricks could be cold when
North holds only one ace. If you bid Blackwood and advance to the slam
when North does show one ace, however, you could have two top club
losers. Souths cue-bid of 5H was a better option and North, with
controls in both minors, advanced to the small slam. Declarer won the
diamond lead with the ace and played a trump to the ace, East showing
out. Suppose you had been South. How would you have played from this
point? Declarer had to aim for a 3-card ending where West held only
Q-J-6 of trumps. He could then be end-played. West would need to hold
three hearts and to be 3-3 or 4-2 in the minors. To play the hand
successfully, declarer needed to guess which. By about 6-to-4, the odds
favour West being 3-3. Declarer played three top hearts, a club to the
queen, and the diamond king throwing a heart. He then ruffed a diamond
in hand, crossed to the club ace, and ruffed a club in hand. Down to
K-10 of trumps and a heart, he next led the heart. West was down to
Q-J-6 of trumps with dummy poised to over ruff the 6 with the 8. He had
to ruff high and lead into Souths trump tenace. Slam made! You
can see how useless
Blackwood would be on the South had. Twelve tricks could be cold when
North holds only one ace. If you bid Blackwood and advance to the slam
when North does show one ace, however, you could have two top club
losers. Souths cue-bid of 5H was a better option and North, with
controls in both minors, advanced to the small slam. Declarer won the
diamond lead with the ace and played a trump to the ace, East showing
out. Suppose you had been South. How would you have played from this
point? Declarer had to aim for a 3-card ending where West held only
Q-J-6 of trumps. He could then be end-played. West would need to hold
three hearts and to be 3-3 or 4-2 in the minors. To play the hand
successfully, declarer needed to guess which. By about 6-to-4, the odds
favour West being 3-3. Declarer played three top hearts, a club to the
queen, and the diamond king throwing a heart. He then ruffed a diamond
in hand, crossed to the club ace, and ruffed a club in hand. Down to
K-10 of trumps and a heart, he next led the heart. West was down to
Q-J-6 of trumps with dummy poised to over ruff the 6 with the 8. He had
to ruff high and lead into Souths trump tenace. Slam made!
Answer
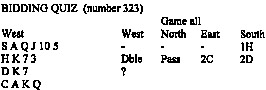 What
would you say now on the West cards? What
would you say now on the West cards?
If partner had nothing useful, you could easily lose five tricks when playing in spades. Thats because you will not be able to cross to dummy to lead towards your hand. I like 2S best. It is a slight underbid but the alternatives are likely to put you too high. A second double would show a strong hand but it would not tell partner about the five spades.
Awards: 2S-10, 3S/Dble-7, 2NT/2H-5, 4S/4C-3.
David Bird (Knight Features)
|
