|
Bridge
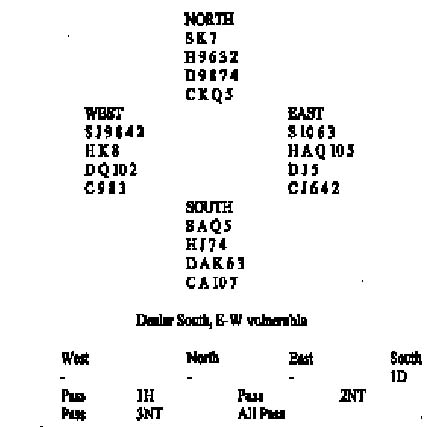 The
deal comes from the Australian National Open Teams and the bidding was
the same at both tables. West led the four of spades and both declarers
won with dummys king. How would you have played the hand? One
declarer played ace, king and another diamond. East signalled with the
six of clubs on the third round to show no interest in clubs (the high
card indicated an even number of clubs, although this was not relevant
here). West could see a possible nine tricks for declarer. He had three
diamond tricks and at least three club tricks. If he held the spade
queen as well as the marked ace, this would bring his total to nine. It
was fairly clear to switch to the king of hearts. East produced the
goods and the game was one down. At the other table declarer was more
cunning. After winning the spade lead, he played ace and another
diamond. This time East won and no signals could be exchanged. East
cannot be blamed for returning a spade but now declarer could claim his
contract. The
deal comes from the Australian National Open Teams and the bidding was
the same at both tables. West led the four of spades and both declarers
won with dummys king. How would you have played the hand? One
declarer played ace, king and another diamond. East signalled with the
six of clubs on the third round to show no interest in clubs (the high
card indicated an even number of clubs, although this was not relevant
here). West could see a possible nine tricks for declarer. He had three
diamond tricks and at least three club tricks. If he held the spade
queen as well as the marked ace, this would bring his total to nine. It
was fairly clear to switch to the king of hearts. East produced the
goods and the game was one down. At the other table declarer was more
cunning. After winning the spade lead, he played ace and another
diamond. This time East won and no signals could be exchanged. East
cannot be blamed for returning a spade but now declarer could claim his
contract.
What would you say on the
West cards?
You are too weak to double INT. It is better to raise the spades and you are worth only a single raise, particularly as South has warned you that he has a spade stopper over partners holding. A response of 2H would show a sound raise, inviting game, but you are not quite strong enough for this action.
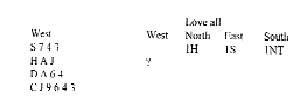
Awards: 2S - 10, 2H - 8, Double - 5, Pass -3.
David Bird (Knight Features)
|
