|
Bridge
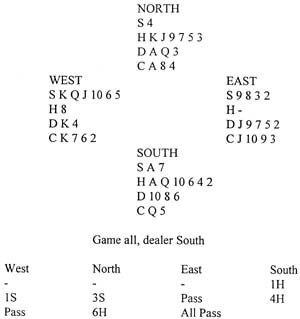 THIS
is a defensive problem from the West seat, so cover the East and South
cards and see how you fare. You lead the spade king against 6H. Partner
plays the 8, to indicate an even number of cards in the suit, and
declarer wins with the ace. At Trick 2 declarer leads the six of
diamonds. Do you play the king or the four? What is the reason for your
choice? At the table West followed with the four. Declarer finessed the
queen successfully, returned to his hand with the ace of trumps, and
ruffed his spade loser. He then crossed back to his hand with a second
trump and led another diamond. When the king appeared from West, the
card was allowed to hold. West was end-played and forced to lead a club
from the king or to concede a ruff-and-discard. Either way declarers
club loser would vanish into the night and the slam was made. West
should have played the king of diamonds at Trick 2. This could hardly
cost since if declarer held J-x-x- in the suit, he would make three
diamond tricks anyway. As the play went, West could also have discarded
the diamond king on the second round of trumps. THIS
is a defensive problem from the West seat, so cover the East and South
cards and see how you fare. You lead the spade king against 6H. Partner
plays the 8, to indicate an even number of cards in the suit, and
declarer wins with the ace. At Trick 2 declarer leads the six of
diamonds. Do you play the king or the four? What is the reason for your
choice? At the table West followed with the four. Declarer finessed the
queen successfully, returned to his hand with the ace of trumps, and
ruffed his spade loser. He then crossed back to his hand with a second
trump and led another diamond. When the king appeared from West, the
card was allowed to hold. West was end-played and forced to lead a club
from the king or to concede a ruff-and-discard. Either way declarers
club loser would vanish into the night and the slam was made. West
should have played the king of diamonds at Trick 2. This could hardly
cost since if declarer held J-x-x- in the suit, he would make three
diamond tricks anyway. As the play went, West could also have discarded
the diamond king on the second round of trumps.
 What should you say now on
those West cards? What should you say now on
those West cards?
Answer
From the information
you have at present, your best guess as to partners shape is that he
holds five hearts and four diamonds. You should rebid 2H, giving false
preference to his first suit. This is partly because a 5-2 fit will
play better than a 4-3 fit. The main reason is that it will give partner
the opportunity to bid again if he wishes. If he were to continue with
2S, for example, you would jump to 3NT. Awards: 2H -10,Pass - 6, 2NT -4.
David Bird (Knight Features)
|
