|
Bridge
David Bird
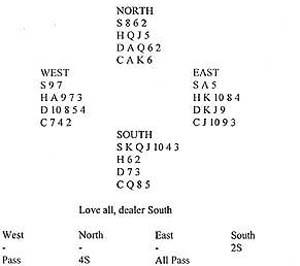 3NT would have proved unbeatable, as the cards lie, but North cannot
be blamed for preferring to raise to 4S. Take the West cards and see how
you fare in defence. You lead a trump, partner winning with the ace and
returning the jack of clubs to the dummys ace. After drawing a second
round of trumps with the king, declarer leads a low heart from his hand.
What will you do? You have a good picture of the whole deal. Your
partners jack of clubs denied the queen, so you can place declarer
with five trump tricks, three club tricks and the diamond ace. A heart
trick will bring his total to ten, so you must act quickly to set up a
fourth trick for the defence. Rise with the heart ace and switch to a
diamond. Declarer will have little option but to try the finesse. When
it fails, your partner will cash a heart for one down. If instead you
play low on the first heart, your partner will have to win the trick. He
cannot attack diamonds successfully from his side of the table and the
game will be made. 3NT would have proved unbeatable, as the cards lie, but North cannot
be blamed for preferring to raise to 4S. Take the West cards and see how
you fare in defence. You lead a trump, partner winning with the ace and
returning the jack of clubs to the dummys ace. After drawing a second
round of trumps with the king, declarer leads a low heart from his hand.
What will you do? You have a good picture of the whole deal. Your
partners jack of clubs denied the queen, so you can place declarer
with five trump tricks, three club tricks and the diamond ace. A heart
trick will bring his total to ten, so you must act quickly to set up a
fourth trick for the defence. Rise with the heart ace and switch to a
diamond. Declarer will have little option but to try the finesse. When
it fails, your partner will cash a heart for one down. If instead you
play low on the first heart, your partner will have to win the trick. He
cannot attack diamonds successfully from his side of the table and the
game will be made.
Answer
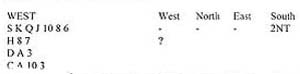 If you bid 3S you might easily go down. You have only
seven tricks in your own hand and no reason to expect partner to add two
more than South has opened 2NT. You could pass and take a penalty
against 2NT, but why not be more ambitious? The best call is a penalty
double! Its true that North might be able to escape into some long
suit at the three-level, but a double still rates to work out best.
Awards: Double - 10, Pass - 7, 3S - 4. If you bid 3S you might easily go down. You have only
seven tricks in your own hand and no reason to expect partner to add two
more than South has opened 2NT. You could pass and take a penalty
against 2NT, but why not be more ambitious? The best call is a penalty
double! Its true that North might be able to escape into some long
suit at the three-level, but a double still rates to work out best.
Awards: Double - 10, Pass - 7, 3S - 4.
Knight Features
|
