|
bridge
David Bird
 Norths
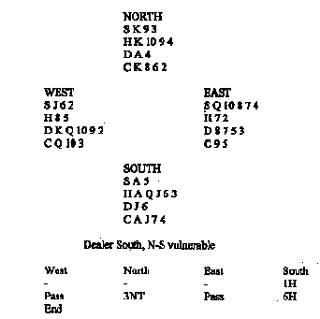
3NT response showed a sound raise to game in hearts with no side-suit
singleton. (With a singleton diamond, for example, he would have made a
splinter bid of 4D instead). South punted a small slam, with no further
investigation, and West led the king of diamonds. Declarer won with the
ace and drew trumps in two rounds. He eliminated the spade suit, by
cashing the ace and king and ruffing the third round. He then played the
jack of diamonds, throwing West on lead. Suppose you had been West. What
would you have done next? East had played high-low in diamonds, so West
knew that Souths jack of diamonds was indeed his last card in the
suit. Since a diamond would give declarer a ruff-and-discard, West
decided to exit in clubs. This was not the best move. South won with the
jack and had twelve tricks when the suit proved to be 3-2. West should
have paused slightly longer until he had worked out declarers
shape. South was known to hold two spades, five trumps and two diamonds.
He therefore held four clubs, which meant that a ruff-and-discard would
be no use to him! Had West exited with a third diamond, a slam would
have gone down. Declarer would be left with an unavoidable club loser. Norths
3NT response showed a sound raise to game in hearts with no side-suit
singleton. (With a singleton diamond, for example, he would have made a
splinter bid of 4D instead). South punted a small slam, with no further
investigation, and West led the king of diamonds. Declarer won with the
ace and drew trumps in two rounds. He eliminated the spade suit, by
cashing the ace and king and ruffing the third round. He then played the
jack of diamonds, throwing West on lead. Suppose you had been West. What
would you have done next? East had played high-low in diamonds, so West
knew that Souths jack of diamonds was indeed his last card in the
suit. Since a diamond would give declarer a ruff-and-discard, West
decided to exit in clubs. This was not the best move. South won with the
jack and had twelve tricks when the suit proved to be 3-2. West should
have paused slightly longer until he had worked out declarers
shape. South was known to hold two spades, five trumps and two diamonds.
He therefore held four clubs, which meant that a ruff-and-discard would
be no use to him! Had West exited with a third diamond, a slam would
have gone down. Declarer would be left with an unavoidable club loser.
What would you rebid on the West cards?
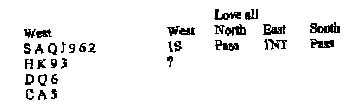
Some players would
rebid 3S without thinking. The queen of diamonds is a dubious value,
however, and partner may hold only one spade. I dont think this hand
is quite strong enough for 3S and would bid only 2S.
Awards: 2S -10, 3S - 7, 2 NT - 5, Pass
-3.
Knight Features
|
