|
Bridge
David Bird
 East-West
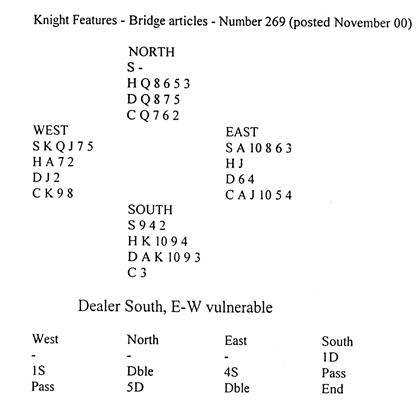
suffered a disaster on this deal. Who do you think should take the
blame? West led the spade king against 5D doubled. Declarer ruffed in
the dummy and drew trumps in two rounds. A heart to the jack, king and
ace set up that suit. West was reluctant to switch to clubs and returned
another heart, allowing declarer to throw his singleton club on the
fifth heart. This did not actually cost a trick since he had only one
trump left in dummy and two spades to ruff. Had West cashed a club,
declarer would have ruffed his second spade and discarded the third. The
defenders could defeat 5D only by taking a heart ruff. Indeed, if West
starts with the ace and two of hearts (a McKenney signal asking for a
return of the lower side suit), East can ruff and return a low club,
putting the game two down. This is a most unlikely opening lead and the
disaster had occurred in the bidding. 5S could be made by guessing the
clubs. Rather than bidding 4S. East might try 4H a splinter bid
agreeing spades and showing at most one heart. This would indicate the
successful defence against diamonds too. An alternative was 3C, a
fit-jump bid, showing a spade fit and a good side suit of clubs. Both
these bids would suggest to West that 5S might be playable. East-West
suffered a disaster on this deal. Who do you think should take the
blame? West led the spade king against 5D doubled. Declarer ruffed in
the dummy and drew trumps in two rounds. A heart to the jack, king and
ace set up that suit. West was reluctant to switch to clubs and returned
another heart, allowing declarer to throw his singleton club on the
fifth heart. This did not actually cost a trick since he had only one
trump left in dummy and two spades to ruff. Had West cashed a club,
declarer would have ruffed his second spade and discarded the third. The
defenders could defeat 5D only by taking a heart ruff. Indeed, if West
starts with the ace and two of hearts (a McKenney signal asking for a
return of the lower side suit), East can ruff and return a low club,
putting the game two down. This is a most unlikely opening lead and the
disaster had occurred in the bidding. 5S could be made by guessing the
clubs. Rather than bidding 4S. East might try 4H a splinter bid
agreeing spades and showing at most one heart. This would indicate the
successful defence against diamonds too. An alternative was 3C, a
fit-jump bid, showing a spade fit and a good side suit of clubs. Both
these bids would suggest to West that 5S might be playable.
What would you say now?
Answer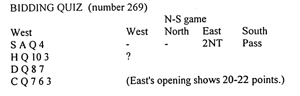
If partner has only 20
points, your 12-count is not likely to give him a reasonable play for
6NT. You need partner to be at the maximum end of the range for the
opening 2NT and the best response is 4NT. If partner has 20 points, or a
moderate 21 points, he will pass. With a better hand he will bid 6NT.
Awards: 4NT - 10, 6NT - 6,
Pass -4.
Knight Features
|
