|
BRIDGE
 Norths
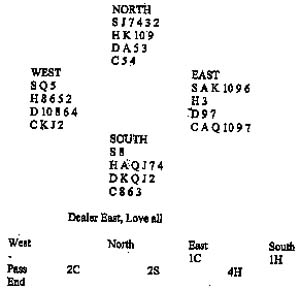
bid of 2C indicated a sound raise to at least 2H. He was borderline
for the bid, but since he would have made a pre-emptive raise to 2H
without the diamond ace it was valuable to distinguish between the two
hands. West made a strong start to the defence when he led a trump,
rather than one of the black suits. Declarer won with dummys ten of
trumps and led a club, taken by Wests jack. Back came another
trump. East showing out. How would you have played the hand from this
point? It was hopeless to play another club. West would surely win and
remove dummys last trump, leaving no chance whatsoever of a tenth
trick. Declarer could spot just one chance of success to find West
with four diamonds alongside his four trumps. In fact, this was not
such a small chance after Easts bidding in the black suits. Four
rounds of diamonds duly stood up, which allowed declarer to throw a
club from dummy. After ruffing a club, declarer played a spade won by
East. Declarer ruffed the club return high (in fact he had only high
trumps left), drew Wests last trump, and claimed the contract. Norths
bid of 2C indicated a sound raise to at least 2H. He was borderline
for the bid, but since he would have made a pre-emptive raise to 2H
without the diamond ace it was valuable to distinguish between the two
hands. West made a strong start to the defence when he led a trump,
rather than one of the black suits. Declarer won with dummys ten of
trumps and led a club, taken by Wests jack. Back came another
trump. East showing out. How would you have played the hand from this
point? It was hopeless to play another club. West would surely win and
remove dummys last trump, leaving no chance whatsoever of a tenth
trick. Declarer could spot just one chance of success to find West
with four diamonds alongside his four trumps. In fact, this was not
such a small chance after Easts bidding in the black suits. Four
rounds of diamonds duly stood up, which allowed declarer to throw a
club from dummy. After ruffing a club, declarer played a spade won by
East. Declarer ruffed the club return high (in fact he had only high
trumps left), drew Wests last trump, and claimed the contract.
What would you say now
on the West cards?
Answer
Partners 2H response
promises five cards in the suit (unless he has precisely 3-4, 3-3
shape and is planning to rever to spades). You should therefore raise
the heart suit. To rebid 3H would be non-forcing showing a minimum
hand. With a full fifteen points, you should raise to 4H.
Awards: 4H-10, 3D/2NT-6,
3NT/3S/3H-4.
David Bird
Knight Features
|
