|
Bridge
 A
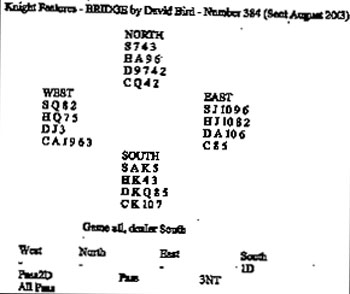
2NT rebid would have been enough on Souths rather empty hand with
only four diamonds. He decided to bid 3NT, however, and West led the
six of clubs, East playing the eight. Suppose you had been South. How
would you have played the contract? If you make two club tricks, that
will give you a total of six tricks outside the diamond suit. You
therefore need three diamond tricks. East will have to hold the
diamond ace. If this card is twice guarded, you will need to lead
diamonds twice from the dummy. How can you enter dummy twice for this
purpose? Here is only one answer. You must win the first trick with
the king of clubs rather than the ten. You then cross to the ace of
hearts and lead a diamond to the king. All goes well when this card
wins. You then lead a club, to set up dummys club queen as an
entry. There is nothing West can do. If he plays low, you will win the
trick with dummys queen and play another diamond, setting up nine
tricks. The only other defence that West can try is to rise with the
ace of clubs and play another heart. Fortunately for you, hearts break
4-3, so the defenders cannot set up enough tricks to beat you. It was
an unlucky opening lead from West. If he leads any other suit, even a
diamond, the contract goes down! A
2NT rebid would have been enough on Souths rather empty hand with
only four diamonds. He decided to bid 3NT, however, and West led the
six of clubs, East playing the eight. Suppose you had been South. How
would you have played the contract? If you make two club tricks, that
will give you a total of six tricks outside the diamond suit. You
therefore need three diamond tricks. East will have to hold the
diamond ace. If this card is twice guarded, you will need to lead
diamonds twice from the dummy. How can you enter dummy twice for this
purpose? Here is only one answer. You must win the first trick with
the king of clubs rather than the ten. You then cross to the ace of
hearts and lead a diamond to the king. All goes well when this card
wins. You then lead a club, to set up dummys club queen as an
entry. There is nothing West can do. If he plays low, you will win the
trick with dummys queen and play another diamond, setting up nine
tricks. The only other defence that West can try is to rise with the
ace of clubs and play another heart. Fortunately for you, hearts break
4-3, so the defenders cannot set up enough tricks to beat you. It was
an unlucky opening lead from West. If he leads any other suit, even a
diamond, the contract goes down!
Answer
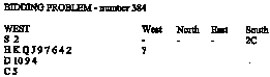 Souths opening bid
has announced that his side hold game values (or thereabouts). You
should bid 4H to remove the bidding space from the opponents. Even
when you are vulnerable against not, the bid is likely to gain in the
long run. Souths opening bid
has announced that his side hold game values (or thereabouts). You
should bid 4H to remove the bidding space from the opponents. Even
when you are vulnerable against not, the bid is likely to gain in the
long run.
AWARDS: 4H-10, 3H-7,
2H-3.
David Bird
Knight Features
|
