|
Bridge
 3NT
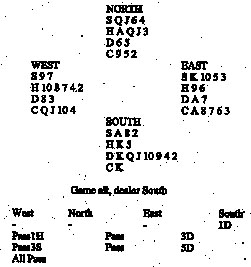
would have been hopeless and North-South bid well to reach 5D instead.
Norths 3S showed a spade stopper (not necessarily a four-card suit)
and told partner that he held no club guard. Since the singleton king
was a dubious stopper in clubs, South leapt to the game in diamonds.
Excellent bidding. Right, now take the East cards and see if you can
beat the contract. Your partner, West, leads the queen of clubs and
you win with the ace, the king failing from declarer. What next? South
is almost certain to hold the 13 points that are missing outside the
club suit. Even if he holds only six diamonds, you can count five
diamond tricks, two spades with the finesse, and four heart tricksa
total of eleven. The only hope is to cut declarer off from the dummy,
which can be done if declarer holds only two hearts. At Trick 2, you
return a heart, won with the king. When the king of trumps is led, you
win immediately (so that you still have a trump left) and return your
remaining heart, won in the dummy. Deprived of four heart tricks,
declarer leads the spade queen. You must refuse to cover and now the
contract is doomed. You ruff the next top heart and the game in one
down. Good bidding, good defence! 3NT
would have been hopeless and North-South bid well to reach 5D instead.
Norths 3S showed a spade stopper (not necessarily a four-card suit)
and told partner that he held no club guard. Since the singleton king
was a dubious stopper in clubs, South leapt to the game in diamonds.
Excellent bidding. Right, now take the East cards and see if you can
beat the contract. Your partner, West, leads the queen of clubs and
you win with the ace, the king failing from declarer. What next? South
is almost certain to hold the 13 points that are missing outside the
club suit. Even if he holds only six diamonds, you can count five
diamond tricks, two spades with the finesse, and four heart tricksa
total of eleven. The only hope is to cut declarer off from the dummy,
which can be done if declarer holds only two hearts. At Trick 2, you
return a heart, won with the king. When the king of trumps is led, you
win immediately (so that you still have a trump left) and return your
remaining heart, won in the dummy. Deprived of four heart tricks,
declarer leads the spade queen. You must refuse to cover and now the
contract is doomed. You ruff the next top heart and the game in one
down. Good bidding, good defence!
What action will you
take over Souths 1H opening?
Answer
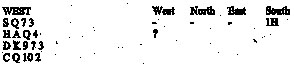 You are not strong enough to overall 1NT (which shows around 15-18 points). Nor is your shape suitable for a take-out double. The only sound action is to pass. Inexperienced players tend to think for a white before passing, which gives information away. Pass straight away! You are not strong enough to overall 1NT (which shows around 15-18 points). Nor is your shape suitable for a take-out double. The only sound action is to pass. Inexperienced players tend to think for a white before passing, which gives information away. Pass straight away!
AWARDS: Pass-10, Double-5, INT-3, 2D-1.
David Bird Knight Features
|
