|
Bridge
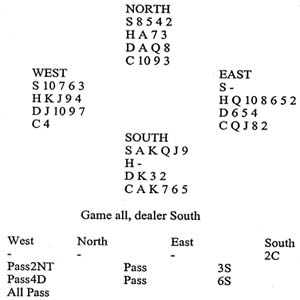 Norths
2NT suggests around 8 points upwards and a balanced hand. His
subsequent 4D is a cue-bid that agrees spades as trumps and shows a
control in diamonds. Although a grand slam is still possible, South
decides that it will be too difficult to locate the minor-suit queens
and jumps to 6S. How would you play this contract when West leads the
jack of diamonds? You win with the diamond king and draw trumps in
four rounds. All now depends on bringing in the club suit for only one
loser. If you start by cashing the ace of clubs you will go down. Even
if your next move is to lead the ten from dummy, East will cover and
eventually score two club tricks. Best is to cross to the diamond
queen at Trick 6 and lead the ten of clubs from dummy, planning to run
the card. When the cards lie as in the diagram, East will have to
cover. You win and then lead towards dummys nine. You can
subsequently reach dummy again with a diamond to finesse against Easts
eight of clubs. Slam made. Suppose, on a different lie of the cards,
that West wins when you run the ten of clubs. You would then continue
with the ace, hoping for a 3-2 break. playing clubs in this way gives
you an 84 per cent chance of scoring the four tricks you need. Norths
2NT suggests around 8 points upwards and a balanced hand. His
subsequent 4D is a cue-bid that agrees spades as trumps and shows a
control in diamonds. Although a grand slam is still possible, South
decides that it will be too difficult to locate the minor-suit queens
and jumps to 6S. How would you play this contract when West leads the
jack of diamonds? You win with the diamond king and draw trumps in
four rounds. All now depends on bringing in the club suit for only one
loser. If you start by cashing the ace of clubs you will go down. Even
if your next move is to lead the ten from dummy, East will cover and
eventually score two club tricks. Best is to cross to the diamond
queen at Trick 6 and lead the ten of clubs from dummy, planning to run
the card. When the cards lie as in the diagram, East will have to
cover. You win and then lead towards dummys nine. You can
subsequently reach dummy again with a diamond to finesse against Easts
eight of clubs. Slam made. Suppose, on a different lie of the cards,
that West wins when you run the ten of clubs. You would then continue
with the ace, hoping for a 3-2 break. playing clubs in this way gives
you an 84 per cent chance of scoring the four tricks you need.
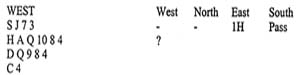 What
response will you make to partners opening bid of 1H? What
response will you make to partners opening bid of 1H?
Answer
Even if partners
opening bid does not promise five hearts, you are worth a direct game
response of 4H. The purpose is two-fold. Your partner may well make
the contract. At the same time you make it very difficult for North to
enter the bidding if he happens to hold a strong hand.
AWARDS: 4H-10, 3H-7, 4C
(splinter bid)-5, 2H-2.
David Bird Knight
Features
|
