|
Bridge
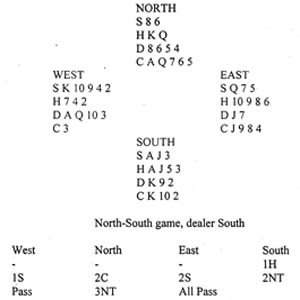 WEST leads the ten of
spades against 3NT and East plays the queen. How will you play? You
have eight top tricks and if the clubs come in you will easily bump
your total to ten. You must arrange the play so you can survive even
if the clubs break 4-1. Win the first round of spades. This will leave
you with J-3 of spades in your hand, which will stop the suit
effectively if West gains the lead. Next you cross to dummy with the
king of hearts and cash the queen of hearts. Now comes the key play.
You lead a low club from dummy and finesse the ten. You do not mind
whether the finesse wins or loses. When the cards lie as in the
diagram, the club finesse will win. That gives you ten top tricks and
in fact you can cash the heart winners, followed by the clubs to catch
West in an end-play for an eleventh trick. (If he keeps K-9 of spades
and the bare diamond ace, throw him in with a diamond. If he keeps A-Q
of diamonds and the bare spade king, throw him in with a spade.) What
would happen if the club finesse lost to the jack? The safe hand would
be on lead. He could not play a diamond or a spade without giving you
an extra trick and on a passive return you would have nine tricks to
cash. Note that it is not entirely safe to cross to the club ace to
finesse in clubs. If this lost and a club came back, this would cause
a blockage. WEST leads the ten of
spades against 3NT and East plays the queen. How will you play? You
have eight top tricks and if the clubs come in you will easily bump
your total to ten. You must arrange the play so you can survive even
if the clubs break 4-1. Win the first round of spades. This will leave
you with J-3 of spades in your hand, which will stop the suit
effectively if West gains the lead. Next you cross to dummy with the
king of hearts and cash the queen of hearts. Now comes the key play.
You lead a low club from dummy and finesse the ten. You do not mind
whether the finesse wins or loses. When the cards lie as in the
diagram, the club finesse will win. That gives you ten top tricks and
in fact you can cash the heart winners, followed by the clubs to catch
West in an end-play for an eleventh trick. (If he keeps K-9 of spades
and the bare diamond ace, throw him in with a diamond. If he keeps A-Q
of diamonds and the bare spade king, throw him in with a spade.) What
would happen if the club finesse lost to the jack? The safe hand would
be on lead. He could not play a diamond or a spade without giving you
an extra trick and on a passive return you would have nine tricks to
cash. Note that it is not entirely safe to cross to the club ace to
finesse in clubs. If this lost and a club came back, this would cause
a blockage.
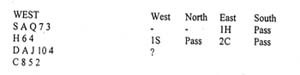 What will you say now? What will you say now?
Answer
You have a substantial
stopper in the unbid suit, diamonds, and sufficient values to justify
a game try. You should therefore look no further than 2NT for your
next bid. A rebid of 2D would be fourth suit forcing, showing a
strong hand on which the best denomination was in doubt.
Awards: 2NT - 10, 3NT -
5, 2D - 4, Pass - 2.
David Bird
Knight Features
|
