|
Bridge
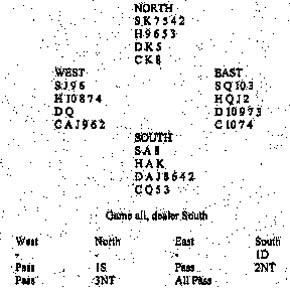 Some players would have
rebid 3H on the North cards, seeking a fit in one of the majors. It is
scarcely worthwhile when you hold only four hearts to the nine. Even
if there is a 5-3 spade fit, the deal may play satisfactorily in
no-trumps. If South has a heart tenace, this will be protected from
the opening lead, too. How would you play 3NT when West leads the six
of clubs? Declarer correctly played the king of clubs from dummy,
since this was the only chance of scoring a trick with the card. His
remaining Q-x in the club suit was a guard only if West gained the
lead. Nine tricks therefore had to be developed without a allowing
East on lead. Declarer cashed dummys king of diamonds, surprised to
see the queen fall from West. When he led a low diamond from dummy,
East inserted the ten and declarer won with the jack. It was no longer
possible to make the contract! Declarer had to set up the diamonds and
when he did so East gained the lead and led a club through the South
hand. One down. To make the contract you must cross to the South hand
in one of the major suits and then lead a diamond towards dummy. When
the queen appears, you duck in the dummy to leave the safe hand on
lead. West cannot constructively play another club from his side of
the table, so your contract is safe. Some players would have
rebid 3H on the North cards, seeking a fit in one of the majors. It is
scarcely worthwhile when you hold only four hearts to the nine. Even
if there is a 5-3 spade fit, the deal may play satisfactorily in
no-trumps. If South has a heart tenace, this will be protected from
the opening lead, too. How would you play 3NT when West leads the six
of clubs? Declarer correctly played the king of clubs from dummy,
since this was the only chance of scoring a trick with the card. His
remaining Q-x in the club suit was a guard only if West gained the
lead. Nine tricks therefore had to be developed without a allowing
East on lead. Declarer cashed dummys king of diamonds, surprised to
see the queen fall from West. When he led a low diamond from dummy,
East inserted the ten and declarer won with the jack. It was no longer
possible to make the contract! Declarer had to set up the diamonds and
when he did so East gained the lead and led a club through the South
hand. One down. To make the contract you must cross to the South hand
in one of the major suits and then lead a diamond towards dummy. When
the queen appears, you duck in the dummy to leave the safe hand on
lead. West cannot constructively play another club from his side of
the table, so your contract is safe.
What will you say now?
Answer
 A response of INT should show
not only a stopper in the enemy suit but around 609 points. It would
not be a good idea to pass because 1H would usually be made. Like it
or not, you will have to bid one of your suits! In such
circumstances, keep the bidding as low as possible. Cross your fingers
here and bid 1S. A response of INT should show
not only a stopper in the enemy suit but around 609 points. It would
not be a good idea to pass because 1H would usually be made. Like it
or not, you will have to bid one of your suits! In such
circumstances, keep the bidding as low as possible. Cross your fingers
here and bid 1S.
AWARDS: 1S-10, 1NT-5,
Pass-4
David Bird
Knight Features
|
