|
Bridge
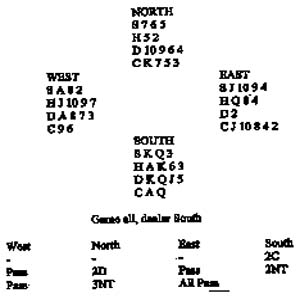 This deal is a defensive
problem, so take the West cards and see how you fare. Declarer shows
23-24 points and arrives in 3NT. You lead the jack of hearts and East
overtakes with the queen of hearts. Declarer, who does not want to
risk a spade switch from East, wins the first heart with the ace and
leads the king of diamonds from his hand. Sitting West, what is your
plan for the defence? The only possible reason to grab the ace of
diamonds at the first opportunity would be if you feared declarer
might otherwise run nine tricks. This is impossible when you hold two
aces, so you should duck the first round of diamonds. You duck the
queen of diamonds at Trick 3 and East shows out, throwing a heart.
Declarer now cashes the ace and queen of clubs and leads the jack of
diamonds. Again you have to duck, or dummys ten of diamonds will
provide an entry to the king of clubs. It is the end of the line for
declarer, who will now go one down. It was not possible to visualise
the entire situation, sitting West, but there could be no advantage in
taking the ace of diamonds early. As it happens, it would have given
away the contract, allowing declarer to score three diamonds, three
clubs and three major-suit winners. This deal is a defensive
problem, so take the West cards and see how you fare. Declarer shows
23-24 points and arrives in 3NT. You lead the jack of hearts and East
overtakes with the queen of hearts. Declarer, who does not want to
risk a spade switch from East, wins the first heart with the ace and
leads the king of diamonds from his hand. Sitting West, what is your
plan for the defence? The only possible reason to grab the ace of
diamonds at the first opportunity would be if you feared declarer
might otherwise run nine tricks. This is impossible when you hold two
aces, so you should duck the first round of diamonds. You duck the
queen of diamonds at Trick 3 and East shows out, throwing a heart.
Declarer now cashes the ace and queen of clubs and leads the jack of
diamonds. Again you have to duck, or dummys ten of diamonds will
provide an entry to the king of clubs. It is the end of the line for
declarer, who will now go one down. It was not possible to visualise
the entire situation, sitting West, but there could be no advantage in
taking the ace of diamonds early. As it happens, it would have given
away the contract, allowing declarer to score three diamonds, three
clubs and three major-suit winners.
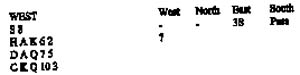 What will you say now on
these West cards? What will you say now on
these West cards?
Answer
You can see how poorly
this hand would play in 3NT. It is very unlikely that you can set up
partners spades and be able to reach them. Indeed, it is quite
possible that 3NT would go at least four down. Instead you should
raise to 4S, where the chances are good that you can score several
trump tricks to add to the high-card tricks in your own hand.
Awards: 4S 10,
Pass-6, 3NT - 2.
David Bird
Knight Features
|
