|
Bridge
 Once
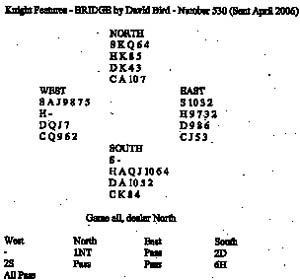
West had suggested good values in spades, South could expect
that a high fraction of his partners strong 1NT would be located in
the three other suits plugging the gaps in his own hand. He leapt
to 6H and West led the queen of diamonds. How would you have played
the contract? Declarer had ten top tricks and could establish an
eleventh trick by conceding a trick to the spade ace, setting up one
of dummys spade honours. A twelfth trick would then arrive by
squeezing West in spades and diamonds. Declarer won the diamond lead
with dummys king and immediately ran the spade king, throwing a
club from his hand. West won with the spade ace and returned a spade
to dummys queen, South discarding a diamond. Running the winners at
this stage would not result in a squeeze because Easts ten was
guarding the spade suit. To isolate the spade guard in the West
hand, declarer ruffed a spade in his hand. Now when the trumps were
run, followed by the king and ace of clubs, West had no answer.
Needing to retain a high spade to guard again the spade six in dummy,
he had to release the seven of diamonds. Declarer completed a polished
piece of play by cashing the ace and ten of diamonds. Slam made! Once
West had suggested good values in spades, South could expect
that a high fraction of his partners strong 1NT would be located in
the three other suits plugging the gaps in his own hand. He leapt
to 6H and West led the queen of diamonds. How would you have played
the contract? Declarer had ten top tricks and could establish an
eleventh trick by conceding a trick to the spade ace, setting up one
of dummys spade honours. A twelfth trick would then arrive by
squeezing West in spades and diamonds. Declarer won the diamond lead
with dummys king and immediately ran the spade king, throwing a
club from his hand. West won with the spade ace and returned a spade
to dummys queen, South discarding a diamond. Running the winners at
this stage would not result in a squeeze because Easts ten was
guarding the spade suit. To isolate the spade guard in the West
hand, declarer ruffed a spade in his hand. Now when the trumps were
run, followed by the king and ace of clubs, West had no answer.
Needing to retain a high spade to guard again the spade six in dummy,
he had to release the seven of diamonds. Declarer completed a polished
piece of play by cashing the ace and ten of diamonds. Slam made!
What will you say now on these West
cards?
Answer
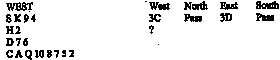 A change of suit is
forcing opposite a pre-empt and you cannot therefore pass. Your best
rebid is 3S, showing some values in that suit. This rebid may allow
partner to say 3NT.There is no need to worry that partner will read
you for four spades because you are unlikely to have opened 3C with
four-card major in your hand. A change of suit is
forcing opposite a pre-empt and you cannot therefore pass. Your best
rebid is 3S, showing some values in that suit. This rebid may allow
partner to say 3NT.There is no need to worry that partner will read
you for four spades because you are unlikely to have opened 3C with
four-card major in your hand.
Awards: 3S 10, 3NT 5, 4C
4, Pass 1.
David Bird
Knight Features
|
