|
|
Dealer West, E-W vulnerable
|
West
|
North
|
East
|
South
|
|
Pass
|
1C
|
Pass
|
1H
|
|
Pass
|
2C
|
Pass
|
3H
|
|
Pass
|
4H
|
Pass
|
4S
|
|
Pass
|
5D
|
Pass
|
6H
|
|
|
|
|
|
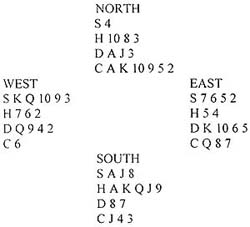 CHARLES
GOREN played this deal, back in 1964. A diamond lead would have proved
lethal but West led the spade king. How would you play the slam? If you
ruff two spades, you will find yourself stranded in the dummy, unable to
return to hand to draw trumps. You must look for a safe way to set up
dummys clubs. You can afford a club loser but not at a time when the
defenders can cash a spade. Finessing in clubs at Trick 2 would not be
safe you would suffer a club ruff. Goren led the jack of clubs to
the ace at Trick 2, returned to the trump ace and led a low club towards
dummy. If West had followed low, he would have finessed the 10,
succeeding whether East ruffed or won with the club queen. West had only
one club but was powerless. If he ruffed, declarer would win his return
and claim the remainder. When he discarded, Goren won with dummys ace
and conceded a club to East. Even if East dislodged the diamond ace,
declarer would be able to draw trumps in three rounds, ending in the
dummy. CHARLES
GOREN played this deal, back in 1964. A diamond lead would have proved
lethal but West led the spade king. How would you play the slam? If you
ruff two spades, you will find yourself stranded in the dummy, unable to
return to hand to draw trumps. You must look for a safe way to set up
dummys clubs. You can afford a club loser but not at a time when the
defenders can cash a spade. Finessing in clubs at Trick 2 would not be
safe you would suffer a club ruff. Goren led the jack of clubs to
the ace at Trick 2, returned to the trump ace and led a low club towards
dummy. If West had followed low, he would have finessed the 10,
succeeding whether East ruffed or won with the club queen. West had only
one club but was powerless. If he ruffed, declarer would win his return
and claim the remainder. When he discarded, Goren won with dummys ace
and conceded a club to East. Even if East dislodged the diamond ace,
declarer would be able to draw trumps in three rounds, ending in the
dummy.
David Bird
|
